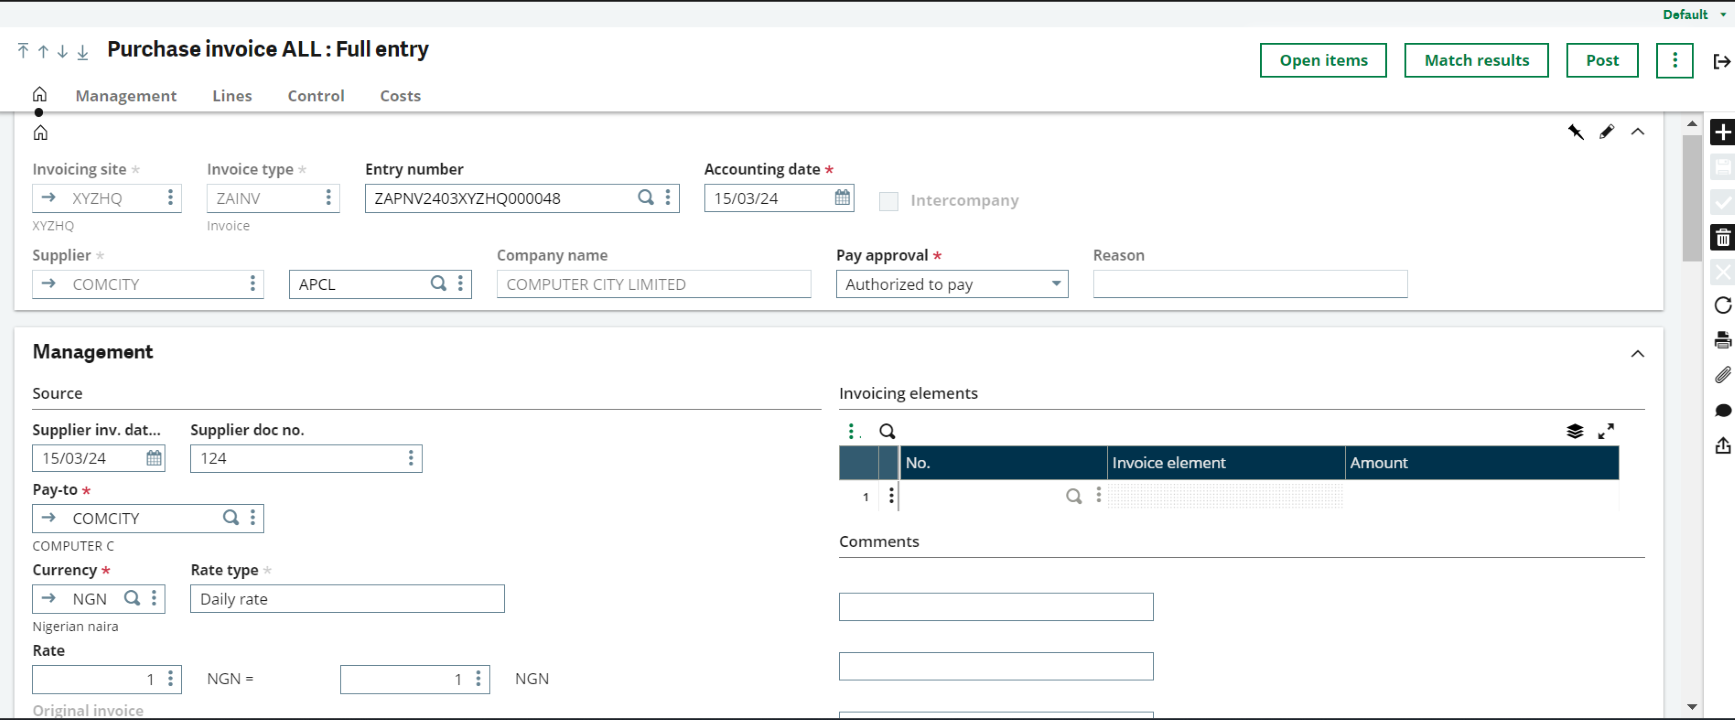
To create a purchase invoice in Sage X3, you’ll follow a series of steps within the purchasing module with this general guide below:
1. Access the Purchase Invoices Module
- Log in to Sage X3 with your credentials.
- Navigate to the Purchasing module from the main menu.
2. Create a New Purchase Invoice
- Once in the Purchasing module, locate and click on the “Purchase Invoices” option.
- Look for a button or link that says “New” or “Create” to start a new purchase invoice.
3. Select the Supplier
- In the new purchase invoice screen, select the supplier from whom you received goods or services.
- You can search for the supplier by name, ID, or other criteria.
4. Enter Invoice Details
- Enter the invoice details such as the invoice number, invoice date, payment terms, and any other relevant information provided by the supplier.
- You may also enter additional information like reference numbers, project codes, or cost centres as required.
5. Add Invoice Lines
- Proceed to add invoice lines corresponding to the items or services you are being billed for.
- Enter item codes, descriptions, quantities, unit prices, taxes, and any applicable discounts.
- You can manually enter invoice lines or select them from previously created purchase orders or receipts.
6. Verify and Confirm Details
- Review the details of the purchase invoice to ensure accuracy. Double-check invoice lines, pricing, quantities, taxes, and payment terms.
- Make any necessary adjustments or corrections before finalising the invoice.
7. Match with Purchase Orders and Receipts (if applicable)
- If you’re using three-way matching (purchase order, receipt, and invoice), Sage X3 can match the invoice with corresponding purchase orders and receipts.
- Verify that the invoiced quantities and prices match the received quantities and prices to ensure accurate billing.
8. Save and Approve the Purchase Invoice
- Once you’re satisfied with the invoice details, finalize and approve the invoice.
- This action confirms that the invoice is ready for payment processing.
- Depending on your organisation’s workflow, the invoice may need to go through an approval process before finalisation.
9. Generate Invoice Documents:
- Sage X3 can generate formal invoice documents based on the information entered.
- You can print the invoice, save it as a PDF, or send it directly to accounts payable for payment processing.
10. Track and Manage Invoices
- Sage X3 allows you to track and manage purchase invoices throughout the accounts payable process.
- Monitor payment statuses, reconcile invoices with purchase orders and receipts, manage approvals and authorizations, and analyse supplier expenses.
11. Payment Processing
- Initiate payment workflows based on approved invoices and payment terms.
- Sage X3 integrates with accounts payable functionalities to facilitate invoice payments to suppliers.
- Process payments via checks, electronic funds transfer (EFT), or other payment methods as per your organisation’s policies.
12. Record Payments and Reconcile Accounts
- After making payments to suppliers, record the payment transactions in Sage X3 to update accounts payable records.
- Reconcile accounts, maintain accurate financial records, and generate reports to track expenses, cash flow, and supplier payments.

